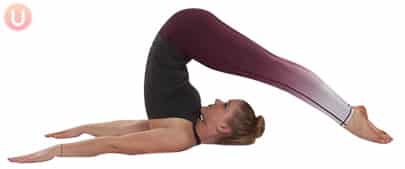
How To Do Plow Pose
Plow Pose is an inversion pose in yoga that stretches your spine, shoulders and upper back while revitalizing your entire nervous system. A tight or sore back is a common complaint that brings many people to try yoga. While plow pose is not something you would jump right into as a newbie, it is a pose that can be learned a little bit at a time. If you are looking for a new challenge or a great way to make your spine more flexible you should learn how to do plow pose.
First and foremost, if you have any problems with or history of injuries in your neck, avoid plow pose. The safety of your cervical spine is crucial and there are other poses, such as happy baby, that can substitute in a safe, less intense way. If you don’t have safety concerns, try doing plow pose for the first time with a sofa or chair behind your head to serve as a place where your feet can rest when they go over your head. While your legs are traveling over your head make sure to engage your core to help the movement go slow and steady, and relax your head and neck keeping your head center and not turning to look to either side. Once your feet reach the chair (or the floor in a full plow pose position), close your eyes, relax and breathe. Your chin should be at your chest and all 7 cervical vertebrae should be aligned in on the ground. Another great way to prepare for plow is to practice a Full Body Roll Up which helps you practice the slow movement of your spine with core control.
Plow Pose is typically done near the end of a yoga practice for two reasons. First, you want to make sure you are completely warmed up. Second, you will find that Plow Pose rejuvenates the nervous system and prepares you for your final relaxation. This makes Plow Pose an excellent choice for a bedtime yoga routine!
1) Begin lying on your back with legs extended straight up in the air above hips. Keep feet together.
2) Placing hands against lower back, engage abdominals and begin lifting legs into the air while supporting lower back with your hands.
3) Continue to send feet behind head until big toes rest on the floor. Relax neck throughout.
