How To Do A Glute Bridge Properly + Variations
The Glute Bridge is a seemingly simple exercise and is a powerhouse move that can help you build strength, improve posture, and sculpt a toned, firm posterior. But, it’s not just about lifting your hips – there’s an art to performing it correctly, and we’re here to share all the insider tips and tricks.
Plus, we’ll introduce you to some exciting variations that will challenge your muscles from different angles and keep your workout routine fresh. So, let’s dive in and learn how to do a glute bridge properly, unlock its full potential, and elevate your fitness game with this popular exercise!
Table of contents
- Why Do Glute Bridge Exercises?
- How To Do A Glute Bridge
- What Muscles Do Glute Bridges Work?
- Benefits of Glute Bridges
- How Many Calories Do Glute Bridges Burn?
- Glute Bridge: Different Variations
- Other Exercises Similar to Glute Bridges
- Incorporating Glute Bridges Into Your Workouts
- Glute Bridge Common Mistakes and Safety Tips
- Glute Bridge FAQs
Why Do Glute Bridge Exercises?
The Glute Bridge exercise is one of the most effective exercises to tone the glute muscles and the hamstrings. This lower body exercise isolates and strengthens the glutes and hamstrings but it truly is a multi-tasking move. It also has the added benefit of engaging and strengthening the core muscles, the hip muscles, and the lower back muscles. By practicing glute bridges regularly, you will not only like the way you look but your backside will be firm and strong.
In addition to helping your performance with daily activities, this is a great exercise for those who spend ample hours sitting at an office desk. The Glute Bridge strengthens the erector spinae, which gives better posture and is particularly important for those who sit for long periods of time.
This lower-body exercise is an effective way to prevent future injuries by strengthening the muscles in the knees and ankles, which will better protect your body in situations where you may be more prone to injury.
This is a great move because it allows for multiple variations to be included in your day-to-day workout. While this exercise does not need any equipment, it is perfect for an at-home workout.
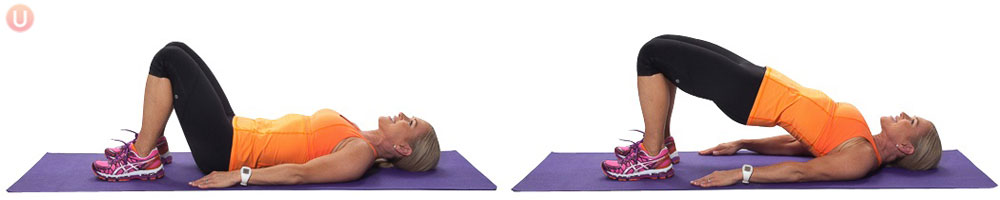
How To Do A Glute Bridge

- Position: Lie flat on your back with your knees bent and feet flat on the floor, hip-width apart.
- Hand placement: Place your arms by your sides with palms facing down for stability.
- Body alignment: Ensure your feet, hips, and shoulders are in a straight line.
- Engage core: Tighten your abdominal muscles to maintain proper form and protect your lower back.
- Lift hips: Push through your heels and lift your hips off the ground towards the ceiling, squeezing your glutes at the top of the movement.
- Hold: Hold the elevated position for 1-2 seconds, maintaining tension in your glutes and core.
- Lower: Slowly lower your hips back down to the starting position, keeping control of the movement.
Repetitions: Perform 10-15 repetitions for 3-4 sets, resting for 30-60 seconds between each set.
Progression: Increase difficulty by adding resistance bands or weights, or by progressing to the elevated feet variation or single-leg glute bridge.
Skip to 0:25 seconds to see Chris Freytag perform glute bridges.
What Muscles Do Glute Bridges Work?
Glute bridges work nearly every lower body muscle including glutes, quads, hamstrings, and calves as well as your core. This exercise works on flattening your tummy, helps tone the muscles that give definition to your six-pack, and gives you a more defined waistline by working the obliques.
The glute bridge will also help you excel at other exercises. The strengthening of the glutes fuels more power, which enhances exercising on all other platforms. Whether running, squatting, or lunging you will see improvement in your reps.
Benefits of Glute Bridges
There are many reasons you should learn good form when doing glute bridges and just as many reasons you should incorporate them into your workouts. Here are just a few:
Work Your Core
Glute bridge is an exercise that works the entire core. It’s probably obvious that the glute bridge works your glutes, given its name. In addition, you use your abdominals to pull your body up and hold it in the lifted position. Your entire core is fired up during this isometric move making it one of the best core exercises around for core stability.
Strengthens Your Back
The Glute bridge is an awesome way to strengthen your back and help you avoid low back pain. As you lift and engage with your core and glutes, you also activate your hamstrings and lower back muscles to keep everything stable.
Stretches Your Chest and Shoulders
The glute bridge is also a great way to get a good stretch in your chest and anterior deltoids, or shoulders. The front of the body opens as you lift your body into the bridge. You can add an extra upper body stretch by clasping your hands below your back and pressing them into the floor.
How Many Calories Do Glute Bridges Burn?
People often ask how many calories they are burning in their workouts. It’s hard to be specific. Calorie burn depends on body weight, fitness level, and effort exerted. This one exercise isn’t a large calorie burner but when incorporated into a 10 minute workout, you generally burn between 50-100 calories every 10 minutes. However, keep in mind this is an isometric pose meaning you will be holding still and squeezing. The benefits are amazing. It’s more about muscle strengthening not calorie burning.
Glute Bridge: Different Variations
For an extra challenge, there are plenty of variations to try:
Elevated Feet

- Position: Lie flat on your back with your knees bent and feet flat on the floor. Place your feet on an elevated surface such as a step, flat bench, or workout box.
- Hand placement: Place your arms by your sides with palms facing down for stability.
- Body alignment: Ensure your feet, hips, and shoulders are in a straight line.
- Engage core: Tighten your abdominal muscles to maintain proper form and protect your lower back.
- Lift hips: Push through your heels and lift your hips off the ground towards the ceiling, squeezing your glutes at the top of the movement.
- Hold: Hold the elevated position for 1-2 seconds, maintaining tension in your glutes and core.
- Lower: Slowly lower your hips back down to the starting position, keeping control of the movement.
Repetitions: Perform 10-15 repetitions for 3-4 sets, resting for 30-60 seconds between each set.
Progression: Increase difficulty by adding resistance bands or weights, or by extending one leg out straight during the lift.
Straightened Legs

- Position: Lie flat on your back with your legs fully extended and feet together, resting on the floor.
- Hand placement: Place your arms by your sides with palms facing down for stability.
- Body alignment: Ensure your feet, hips, and shoulders are in a straight line.
- Engage core: Tighten your abdominal muscles to maintain proper form and protect your lower back.
- Lift hips: Push through your heels and lift your hips off the ground towards the ceiling, squeezing your glutes at the top of the movement. Keep your legs straight throughout the exercise.
- Hold: Hold the elevated position for 1-2 seconds, maintaining tension in your glutes and core.
- Lower: Slowly lower your hips back down to the starting position, keeping control of the movement.
Repetitions: Perform 10-15 repetitions for 3-4 sets, resting for 30-60 seconds between each set.
Progression: Increase difficulty by adding resistance bands or weights, or by elevating your feet on a step, bench, or workout box.
Single-Leg Glute Bridge

- Position: Lie flat on your back with your knees bent and feet flat on the floor, hip-width apart.
- Hand placement: Place your arms by your sides with palms facing down for stability.
- Body alignment: Ensure your feet, hips, and shoulders are in a straight line.
- Engage core: Tighten your abdominal muscles to maintain proper form and protect your lower back.
- Lift one leg: Extend one leg straight out, keeping it parallel to the other thigh. The foot of the extended leg should be flexed.
- Lift hips: Push through the heel of the grounded foot and lift your hips off the ground towards the ceiling, squeezing your glutes at the top of the movement.
- Hold: Hold the elevated position for 1-2 seconds, maintaining tension in your glutes and core.
- Lower: Slowly lower your hips back down to the starting position, keeping control of the movement.
- Switch legs: Repeat the exercise with your other leg extended.
Repetitions: Perform 10-15 repetitions per leg for 3-4 sets, resting for 30-60 seconds between each set.
Progression: Increase difficulty by adding resistance bands or weights, or by elevating your grounded foot on a step, bench, or workout box.
Single-Leg Bridge with Lowered Leg

- Position: Lie flat on your back with your knees bent and feet flat on the floor, hip-width apart.
- Hand placement: Place your arms by your sides with palms facing down for stability.
- Body alignment: Ensure your feet, hips, and shoulders are in a straight line.
- Engage core: Tighten your abdominal muscles to maintain proper form and protect your lower back.
- Lift one leg: Extend one leg straight out, keeping it parallel to the ground and slightly above the floor. The foot of the extended leg should be flexed.
- Lift hips: Push through the heel of the grounded foot and lift your hips off the ground towards the ceiling, squeezing your glutes at the top of the hip lift. Keep the extended leg parallel to the ground throughout the exercise.
- Hold: Hold the elevated position for 1-2 seconds, maintaining tension in your glutes and core.
- Lower: Slowly lower your hips back down to the starting position, keeping control of the movement.
- Switch legs: Repeat the exercise with your other leg extended.
Repetitions: Perform 10-15 repetitions per leg for 3-4 sets, resting for 30-60 seconds between each set.
Progression: Increase difficulty by adding resistance bands or weights, or by elevating your grounded foot on a step, bench, or workout box.
Bridge March

- Position: Lie flat on your back with your knees bent and feet flat on the floor, hip-width apart.
- Hand placement: Place your arms by your sides with palms facing down for stability.
- Body alignment: Ensure your feet, hips, and shoulders are in a straight line.
- Engage core: Tighten your abdominal muscles to maintain proper form and protect your lower back.
- Lift hips: Push through your heels and lift your hips off the ground towards the ceiling, squeezing your glutes at the top of the movement.
- March: While keeping your hips elevated, lift one foot off the ground and bring your knee towards your chest. Hold for a brief moment before lowering the foot back to the ground.
- Switch legs: Repeat the march movement with your other leg, while maintaining the elevated hip position.
- Keep hips stable: Focus on keeping your hips level and avoid swaying or dropping them during the march movement.
Repetitions: Perform 10-15 repetitions per leg for 3-4 sets, resting for 30-60 seconds between each set.
Progression: Increase difficulty by adding a resistance band or weights, or by elevating your feet on a step, bench, or workout box.
Other Exercises Similar to Glute Bridges
Glute bridge is a fantastic exercise to get a strong core and lower back as well as gluteal muscles and hamstrings, but there are other moves that will help achieve strong glutes. Check out a few of these!
Incorporating Glute Bridges Into Your Workouts
A glute bridge can be done as a stand-alone exercise and give you great results and improve your fitness level. But you could also incorporate the glute bridge into a plan with other exercises, including during a good warm-up, during leg workouts, or a full-body workout.
Use Glute Bridges in Your Warm-Up
Because the glute bridge helps to activate and fire up the glutes, it is a good idea to add it in and get a good warm-up. Use the glute bridge in your warm-up like this one:
Warm-Up With Glute Bridge
- 5 inchworms
- 20 hip circles alternating right and left (bring the knees up and around)
- 10 arm circles forward
- 10 arm circles backward
- 10 Glute Bridges – hold each one at the top for 5 seconds and squeeze
Use Glute Bridges For a Lower Body Workout
Often we think of working our lower body with squats and lunges. However, a glute bridge is another excellent way to get this kind of work done and it includes more hamstring than some of these other moves making a great compliment to squats and lunges. A sample workout is listed below.
Leg Day Workout
- 10 Glute Bridge
- 10 Cross Behind Lunge
- 10 Deadlifts
- 10 Backward Lunges
- 10 Stiletto Squats
Rest 20 seconds, then repeat the sequence one more time
Use Glute Bridges In Your Circuit Training
Circuits are a fun way to exercise and get your strength and cardio in all at the same time. The idea behind circuit training is to go from one move, or one “station”, to the next with little or no rest in between. Check this out:
Full Body Circuit Training Workout: Move directly from one exercise to the next with little to no break in between exercises. Rest for 1 minute at the end, then repeat the sequence.
- 30 seconds burpees
- 30 seconds reverse grip double arm row
- 30 seconds jumping jacks
- 30 seconds push-ups
- 30 seconds skaters
- 30 seconds cross behind lunge with lateral raise
- 30 seconds lateral shuffle
- 30 seconds glute bridges
Rest 1 minute. Repeat. Stretch.
Here are 3 more workouts for you to try that incorporate glute bridge:
5 Butt and Belly Burning Tabata Moves
No Squat, No Lunge Better Booty Workout
7 Exercises to Go From Flat to Firm Butt
Glute Bridge Common Mistakes and Safety Tips
- Proper alignment: Ensure your feet, hips, and shoulders are in a straight line to maintain correct form.
- Neutral spine: Avoid excessive arching of the lower back by maintaining a neutral spine throughout the exercise.
- Engage core: Tighten your abdominal muscles to support your lower back and promote stability.
- Push through heels: Focus on pushing through your heels rather than your toes to effectively engage the glutes.
- Controlled movements: Perform slow and deliberate movements during both the lifting and lowering phases to avoid injury.
- Breathe: Remember to breathe consistently throughout the exercise, inhaling as you lower your hips and exhaling as you lift them.
- Progress gradually: Increase difficulty and resistance over time to challenge your muscles, but do so incrementally to prevent strain or risk of injury.
- Listen to your body: If you experience pain or discomfort during the exercise, stop immediately and consult a fitness professional or healthcare provider before continuing.
Glute Bridge FAQs
Aim to include glute bridge exercises in your workout routine 2-3 times per week, allowing for at least one rest day between sessions to give your muscles time to recover.
Yes, glute bridges can help alleviate lower back pain by strengthening the glutes and core muscles, which provide support to the lower back. However, always consult a healthcare professional before starting any exercise regimen if you have ongoing pain or concerns.
Absolutely! Glute bridges are an excellent exercise for individuals of all fitness levels, including beginners. Start with the basic glute bridge and progress to more challenging variations as you become stronger and more comfortable with the exercise.
No, the glute bridge is a bodyweight exercise that can be performed without any special equipment. However, weights can increase the challenge of the exercise as you progress.