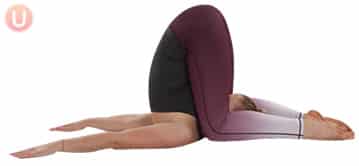
How To Do Ear Pinning Pose
Ear Pinning pose is one of many inversion poses in yoga. Ear Pinning pose opens the hips, lower back, cervical spine, and shoulders. This pose is also a relaxing position that simulates that of a child in the womb. Even though Ear Pinning Pose has a child-like appearance it is not a beginner pose. If you want to learn how to do Ear Pinning Pose, make sure you take it slowly and first learn both Shoulder Stand and Plow Pose. In addition, if you have any problems with or history of injuries in your neck, avoid ear pinning pose. The safety of your cervical spine is crucial and there are other poses, such as happy baby, that can substitute in a safe, less intense way. If you are pregnant, do not perform this pose.
Ear Pinning Pose often occurs at the end of a yoga practice for two reasons. First, it is important that your body is sufficiently warmed up to help you avoid any injuries. If you don’t have much time for preparation, however, Bridge Pose is an excellent choice to help prepare you. Second, this posture quiets the nervous system and prepares you for relaxation pose.
One of the unique ideas behind ear pinning pose is that it removes the ability to hear what is around you and, instead, turn your attention to listen internally. When your knees come back around your head, use them to place a gentle squeeze on your ears. Breathe slowly and listen to the sounds that move throughout the inside of your body. This should help soothe you and slow your nervous system down allowing you to begin moving toward relaxation. At first you may want to try holding this pose for 30 seconds. Once you become more comfortable with it you may be able to stay in this pose for several minutes.
1) Begin lying on your back with legs extended straight up in the air above hips. Keep feet together.
2) Placing hands against lower back, engage abdominals and begin lifting legs into the air while supporting lower back with your hands.
3) Once legs and low back are lifted up, slowly pull knees down to rest on floor next to ears and lower feet to ground. Relax neck throughout.
4) Finish by extending arms straight on floor behind your head.
5) Breathe and hold for 30 seconds.
