This post contains affiliate links. Please see our disclosure policy.

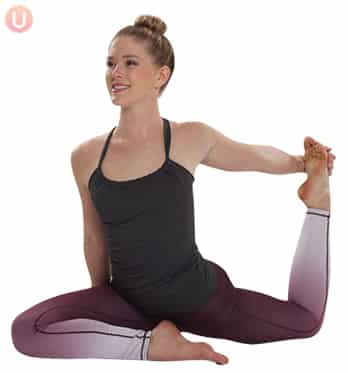
Screaming Pigeon Pose is a deep and powerful stretch for your hips, quads, shoulders, chest and quadriceps. Going beyond the basic pigeon pose, this advanced level will also incorporate balance and posture training. In addition to the hip opener that a pigeon pose provides, you should learn how to do a Screaming Pigeon pose for the added quadriceps stretch and posture training it provides.
A basic Pigeon Pose is one of the most commonly practiced in most yoga classes or workouts. People love to find positions like pigeon that focus on opening up the hips because the hip area is tight on most people whether they are active or inactive. It is important that you learn to do a proper pigeon pose before advancing to the Screaming Pigeon.
However, once Pigeon is learned, Screaming Pigeon is just a few more steps away.
Once you get settled into Pigeon Pose and your hips begin to open, you’ll reach around and take hold of your back foot to add the quad stretch. By reaching your arm behind your body, the inside of your arm, your bicep and front shoulder, begin to stretch and your chest opens up. It also encourages you to sit taller and improve your posture.
The benefits of this run deep. Much of our time is spent in a somewhat hunched over, or forward flexed, position. This causes shortened, tight muscles throughout the front of the body in the chest area which leads to the “hunch back” look and poor posture all around. The screaming pigeon opens and stretches the chest, anterior deltoid and bicep and encourages better posture and spinal alignment.
As a bonus, the king pigeon forces you to engage your core in order to hold the balance you will need to stay in the pose. According to the Mayo Clinic, balance is an important element of our overall fitness, particularly as we age.
Screaming Pigeon Pose Instructions
- Begin in a plank position. Tighten your abdominals and pull your right knee toward your right hand placing your right foot as close to your left hand as you can.
- Keep your back leg long and keep your hips even as you relax your weight through the middle of your hips.
- Keeping right hand flat on floor, reach left arm up and over body and grab hold of your left foot, bending at the left knee.
- Gently pull hand into foot and press foot into hand while sitting tall.
- Breathe and hold for 30 seconds. Step back into plank and switch sides.