This post contains affiliate links. Please see our disclosure policy.

Cow pose is pose anyone can do to open the chest and promote spinal flexibility. Anyone can learn how to do Cow Pose and it remains valuable for both the beginner and the advanced practitioner. Generally used in conjunction with Cat Pose.
Cow Pose is a wonderful way to keep the spine mobile and teach the back to move with articulation – or one vertebrae at a time. Our natural tendencies are to move in large, more structure movements with our spines. This creates an inflexibility in the back which can lead to injury.
For instance, if your back is stiff and you suddenly twist or bend to catch yourself from falling on the ice or to grab someone who is falling near you, the back muscles can easily be pulled or the discs moves out of position.
When Cow Pose and other spinal flexibility positions are practiced on a regular basis, the back has prepared for such quick twists or bends and is less likely to experience an injury.
According to the CDC, back pain strikes 80 percent of the people in our population at some time in their life. This makes it imperative that we teach our spines to be more flexible through poses such as Cow and Cat.
In addition to the benefits this pose provides in your back, you will also feel a nice stretch and opening through your chest and anterior deltoid (front shoulder). Often the chest area is over-strengthened and under-stretched.
Cow pose gives you the opportunity to stretch the chest and pull the shoulders back to promote better posture.
A common error in Cow Pose is being to aggressive with the spine and pressing the belly down too hard toward the floor. Rather, think about lifting through the chest and tailbone and letting the back curve naturally.
For more ways to help with back pain try our blog 12 Yoga Poses to Help Alleviate Back Pain.
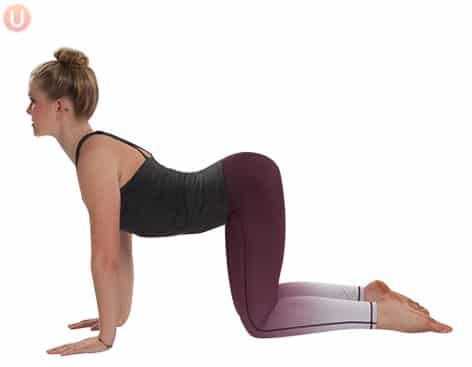
Cow Pose Instructions
- Begin on your hands and knees with hands directly under shoulders and knees directly under hips.
- Start with your spine in a “neutral” or long position, then gently lift your heart and tailbone so your back gently curves downward. Be sure to focus on the lifting – do not press your back downward. Let the curve happen naturally.
- Look slightly upward with a relaxed neck and breathe gently.